“Friendship, love, health, energy, enthusiasm, and joy
are the things that make life worth living and exploring.” ~ Denise Austin

Tuesday, December 16, 2014

Grand Illusion mystery quilt, part 3

Clue #3 was last Friday and I have mostly gathered fabrics, cut some and haven't done any sewing on clue #3.  I hope to do some sewing on this before Friday.
I have been sewing on other projects and I have put some photos on instagram and will blog later about them.
This is such a fun mystery and I love to see what everyone else is doing on this mystery.
I am linking to Bonnie Hunter's Monday Link-up.
Smiles and hugs....Caryl

Tuesday, December 9, 2014

Grand Illusion mystery quilt, part 2

Linking up to Bonnie Hunter at Quiltville with a photo of some of my progress on the quilt.

For part 2 I am using the rectangles and squares method and then making HSTs from the extra cut off from the corners using Bonnie's method of not wasting.  It is fun to be doing this quilt with so many others that are sharing their progress.  Fun....fun....fun!

Smiles and hugs....Caryl

Monday, December 1, 2014

Grand Illusion mystery, part 1

Here is my start of Bonnie Hunter's mystery.  She gave the first clue last Friday at quiltville.blogspot.com.

This is the first time I have used the Easy Angle ruler that Bonnie uses.  I got it several years ago and never got to it before now.  I just purchased several of the Bloc Loc rulers and am using one for squaring the HSTs.  There is really not much to trim with this method.

Smiles and hugs....Caryl

I am linking up to Mystery Monday Link-Up, Part 1


Friday, November 21, 2014

tote bag finish from IG tutorial

 Another finish!!  Yesterday I finished this tote bag that I started several months ago..
 It is from an instagram tutorial by daisycottagequilting and to find it on IG use #bagtutorial
 Sharon uses lots of photos and descriptions to make this.  She said to use fusible interfacing for the lining and that is what I used.  Go check out her tutorial.
 Here is a photo of the right sides together getting ready to sew them together.  I need lots of photos and directions when I am doing a new project so that is why I am including this photo.
Anyone that wants to make one of these I would just do it.  There is a lot of help on the internet and lots of different ways to make a tote!
Our Tuesday small quilt group is working on self-mitered log cabin blocks.  Here is my first one and the pattern is on vellum...thanks to Jan Krentz.  She did a wonderful demo for us on Tuesday night.  I have a lot of 2" strips cut out of lights and darks and I need to find mediums.  This is tricky for me to get them in order.  But this is a very fun block to do!!

Smiles and hugs....Caryl
linking to finish it up Friday crazymomquilts and
Link a Finish Friday Richard and Tonya quilts
Link to Freemotion by the River

Friday, November 14, 2014

Reversible tote finished and some fabrics for mystery

 This week I finished the reversible tote that I started last year....
the instructions are from a free class from Craftsy....Bag Making Basics...
and I purchased the kit to go with the class.
It is easy to make.....
when I do a project like this I like reading the directions AND watching a video.....


The last photo shows fabric I purchased this week for Bonnie Hunter's mystery that starts in two weeks.  She has information at her blog to get fabric ready before she gives the first clue.  At least I will be starting this mystery quilt....     Go check it out.
To find out more.... http://quiltville.blogspot.com/p/grand-illusion-mystery.html

Who else has made the reversible tote?
Who else is doing the mystery?

Smiles and hugs....Caryl
linking to crazy mom quilts
also linking to Freemotion by the River

Friday, November 7, 2014

friendship bag finished

 Here is my cute little friendship bag....made it with no handles...
The tutorial is at psiquilt....very easy to make.
I think everyone should make at least one of these!
 Here is a photo after I quilted it and before cutting off the batting...
I quilted loops and heart leaves.....my favorites when I haven't done FMQ for awhile!
 In between other projects I am sewing up these little 16 patches....
I am using 1½" strips cut about 5" and sew 4 together....
then cross cut into 1½" strips....
then I sew them into 16 patches.
I got the idea for this method from red pepper quilts postage stamp tutorial.

Now I have some other tote bags I have started and I need to finish them.
Smiles and hugs....Caryl

Linking to crazy mom quilts

Friday, October 31, 2014

Sunset color filled the sky

These photos are from yesterday on our cycle ride to the mountains...


 Here is a photo of the sky about two hours before sunset...
 Cuyamaca Park


 Meatloaf dinner was highly recommended by our waitress and it was delicious!
 In Julian at the corner of the town hall looking west.....
At scenic overlook area above Santa Ysabel waiting for the sunset....


These photos do not begin to capture the beauty we saw.....
The whole sky was so beautiful and it stayed gorgeous long after sunset....
We still love riding as much as ever and have no plans for this to be the last ride into the sunset.


Traffic Jam Placemats and bookmarks

 I finally finished all of the four placemats.  I have been working on these for awhile and have photos on instagram from weeks ago when I started these.
I had four blocks I was going to use for a "traffic jam" quilt...a free pattern by Pat Sloan.
I changed my mind and decided to make placemats instead and use the batik squares for making scrappycrossroads blocks.
I put Pat Sloan's Eat Your Fruits 'n Veggies fabric on the sides of the traffic jam blocks to make them placemat size.
Then I did some applique, quilting and have slowly been working on finishing them.
 Earlier this week I was looking for something that I could just sew.  I had the walking foot on my machine and had some batting pieces trimmed from a previous quilt.  I had some 1½" strips left from another project I am working on.....so let's sew!
 Here are the strips sewn to the batting pieces before I cut them apart.
 I used a narrow batting piece as a leader and ender to sew the other three!
 Here they are finished and at different sizes depending on the batting strips!!
And here are the backs.  I guess they will be bookmarks!
Smiles and hugs....Caryl

I am linking to finish it Friday and Link a Finish Friday

Tuesday, October 21, 2014

more decorations

 I decided to add some more photos I have taken of quilty decorations...
the quilt on the wall is from Pat Sloan's book Crooked Cabins and I made it in 2008.
 Pumpkin Party tablerunner I made last year.
 Some of my placemats and tablerunner on the dining room table.
What fun my GGD has painting at our house.....(she is 2½)
and she likes the decorations and is checking them out.  We like seeing her every week.
In this photo I also like the reflections of the lights on the table and the window!
Smiles and hugs....Caryl

Thursday, October 16, 2014

Fall and Halloween decorating

 Here are some of my decorations....the first one is in my kitchen...I love lights!
The front door,,,,,,then the table inside on the left and the wall on the right.


 In the living room.........the tablerunner is from a blog hop in 2010.
I take photos every year to document how I decorated.  I thought I would do a blog post of just some of my photos and decorations
Smiles and hugs....Caryl


Friday, July 25, 2014

Log cabin mug rugs and a quilt card

 Here is what I did with some leftover fabric from Eat Your Fruits n' Veggies by Pat Sloan.......
I wanted to continue making log cabin blocks....
I decided to carry the fabric around the corner on part of it...
This is what I did....
just sew the ends together and then hold it in place and see where the seam looks best...
 Stitch and then trim....I decided to stop and not go any further...
So these became mug rugs/potholders/table mats.........
Here is a photo before I quilted them.

I also made a quilt card at Stamp Delights....thanks Debbie for the instruction......
That photo is in my IG photostream on the sidebar....

Check IG carylquilts for other photos of what I have been working on this week.
Smiles and hugs....Caryl
Link to finish it Friday and Link a Finish Friday.

Thursday, July 10, 2014

giddy 4 patch pillow tutorial

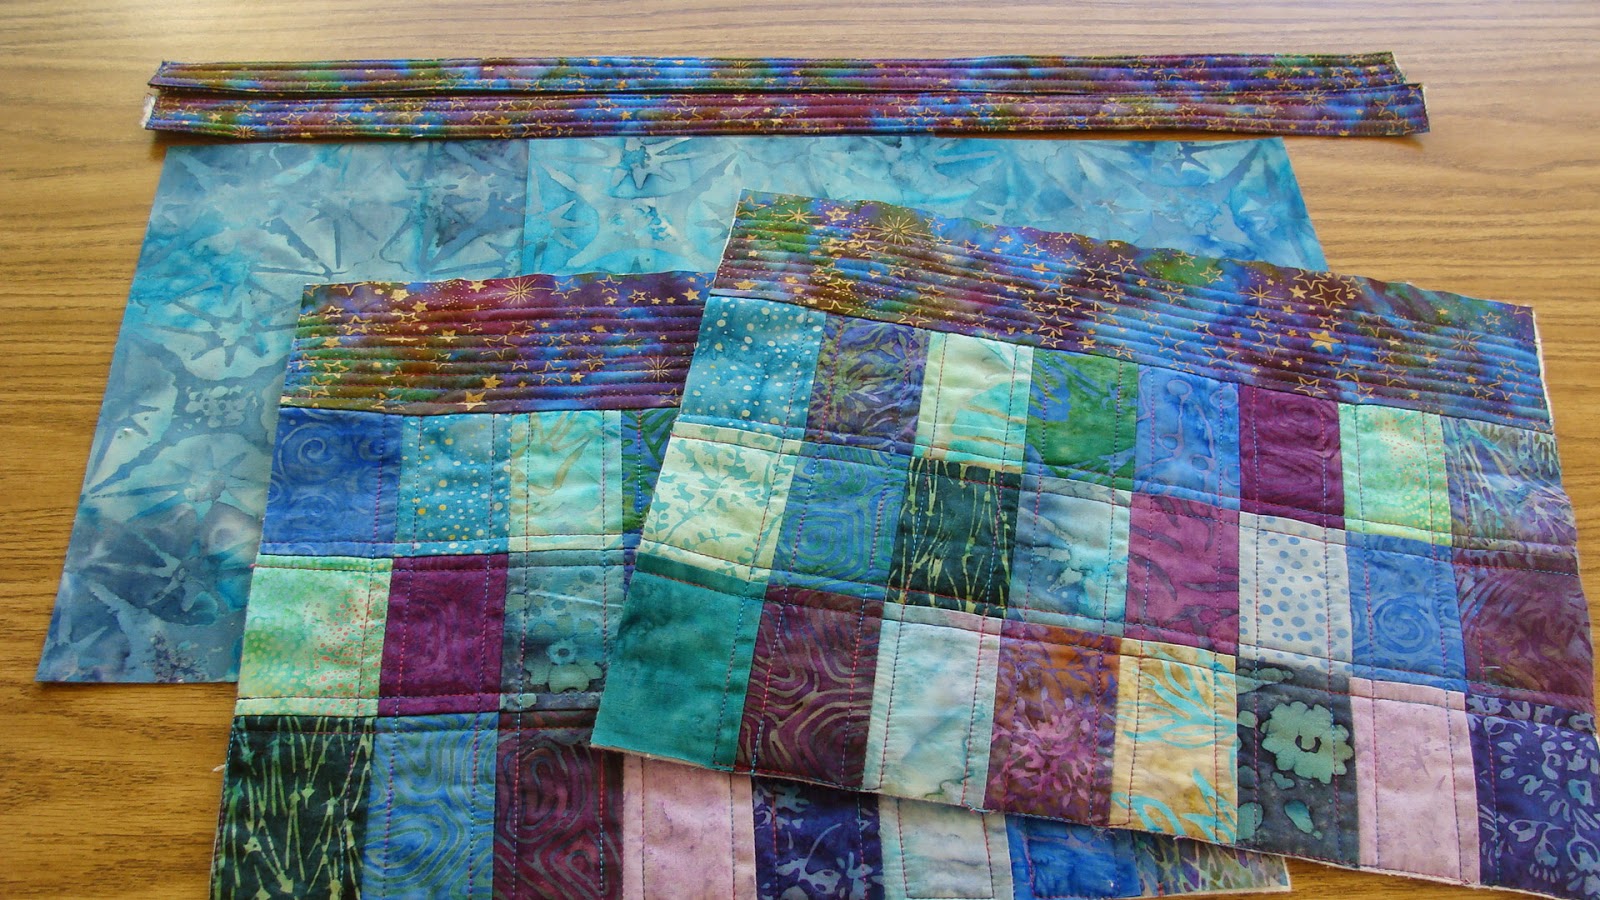
Today I finished a pillow to match my giddy postage stamp quilt I made 3 years ago.........
Here is a tutorial for those who might be interested in how I made this...
For beginners....this would be a fun way to learn to do a project....
I started with charm squares of 8 light and 8 dark....
Pencil lines on the back of the light halfway each way.....
 I used my 34C foot on my Bernina and moved the needle 5 clicks to the right...

Then I had the red line on the foot to follow the pencil line....
Sew on each side of just one of the drawn pencil lines....
 Next cut along the pencil lines....each of the charm pairs makes 4 twosies....
then make them into 4 patches.  You will have 16 4 patches..
Here is a possible layout of all the 4 patches....
I ended up NOT using this layout....the photo really helped me decide I didn't like that one....

I squared each 4 patch to 4½" and sewed together.....it is 16½" square...
I then quilted with the same turquoise thread I used on the quilt.
The back is cut 16½" x 22" and cut in half....then folded the edge under ½" and stitched..
For the envelope opening right sides together and stitch all around....
Very easy and fun to make.  Let me know if you use this tutorial.

Smiles and hugs....Caryl
Linking to Needle and Thread Thursday, finish it up Friday and Link a Finish Friday
Also linking with Connie at Linky Tuesday.