“Friendship, love, health, energy, enthusiasm, and joy
are the things that make life worth living and exploring.” ~ Denise Austin
Showing posts with label tutorial. Show all posts

Tuesday, August 10, 2021

Peltex fabric journal cover tutorial and To-Do Tuesday #67

 To-Do Tuesday #67 and I completed my goals for the past week which were: 

to continue with creative something every day and post on IG.  I plan to turn on my sewing machine and do some sewing/quilting. 

I have posted every day following the challenge by Joanne Sharpe online class to make some kind of creative play artwork every day.  I am posting to my carylquilts IG with  #mojowithjojo.  

Here is a journal cover I made of collaged fabrics on Peltex 72f two sided fusible.


 I have an elastic on the spine to hold the papers inside and a fabric tie to hold it together.  This is probably a temporary way to do this journal  and the next photo is the inside fabric with clocks.  I used the same fabric torn ½" for the tie.


And the cover front and back laid open

The next photo is the inside of the journal with the elastic on the center.  I did some doodle flowers practice and will be adding to the journal page


One of the days this past week I made some fabric snippet rolls.  I cut up one of them and added to the journal cover

The way I did the journal was cut the Peltex 10 x 9 and added pieces of fabric to the top.  I followed the method of stitches by julie.  You lay the fabric beyond the Peltex ½" and use parchment paper to press the fabric onto the Peltex with an iron..  I used some of the charm pieces from June Sew Sampler.  The fabric is The Seamstress by Edyta Sitar of Laundry Basket Quilts.  Also some Tula Pink and Tim Holtz and purple ribbon and coffee dyed lace.  The saying was stamped on coffee dyed muslin.  
The lining is cut the same size as the top fabric and right sides together stitch close to the Peltex with a zipper foot.  I left a 6" opening and trimmed the corners and turned it to the right side.  Then I trimmed to 1/4 " all around except at the opening.  It is easy to press the opening closed to the Peltex and press the back flat.  Then topstitch close to the edge.  I used my BSR2  set on the zigzag and FMQ on the top next to the raw edges.  Straight stitch around the flowers and leaves.  
It was fun getting back to using my sewing machine.  AND it had been awhile since I did FMQ and I forgot the slider under the fabric.  I was wondering why it wasn't moving very well!  Now this was a very fun project.  

For this next week 
  • I will do something creative every day to post to IG and also to my FB creative happenings workshop group.
  • Finish fabric collage on book page hand stitching
  • Work on a sewing project
  • List on my blog the you Tube channels subscriptions since the last time I gave a list
I am linking to To-Do Tuesday at   Chris Knits

Come join in the fun

Smiles and hugs....Caryl

Wednesday, July 7, 2021

Mini Ephemera Holder and Tuesday To Do #63

 This is a day late and it is week #63 of posting a to do list and I will be linking to 

Chris Knits

My progress from the goals from last week:

Tuesday To Do June 29 through July 5:

  1. Practice FMQ
  2. Start quilting Hope quilt
  3. Finish quilting log cabin runner
  4. Make journal cards from index cards
  5. Make a min ephemera holder from paper scraps

 I got most of my goals for the week done.  I still need to do quilting practice on my sewing machine before I tackle quilting a quilt.

Photos of what I worked on with paper crafting.  The mini ephemera holder is made with junk mail and collage over it and add papers and pockets...very easy and very fun.  The outside at the fold is a moda strip that is wrapped around fabric when you purchase precuts.  I need to find some little ephemera to add to this holder.


And here are  some index cards I am making.  Not finished yet.  The two on the right are the back with the lines.  I cut 4x6 index cards in half for these.  I used distress ink and collage and stamps.  Some are coffee dyed and color dyed.  


The next photos show my process in paper dyeing.


Very simple....put some coffee with some water into a spray bottle and lay the paper on parchment paper and spray both sides of the paper.  The color is few drops of color mixed with water and use a brush to spread it on the papers.  I cut the index cards smaller after coffee dye and ink dye.  TIP:  Laying the cards on the very used parchment paper and spreading color on them causes some of the coffee dye from the parchment paper to get on the cards and I like that look.

Here is a photo from earlier in the week when I started on these projects.  I first did an index card covered in brown coffee dye paper and put gelato crayons and discovered I needed to use a pen first if I wanted to do a whimsical flower.  
The bottom part shows the separate pieces of the mini ephemera holder as I started working on it.

Just ask if you have any questions about any of this.  I get my ideas from watching You-Tube videos.  

Tuesday To Do July 6 through July 12:
  1. FMQ practice
  2. Put binding on the log cabin runner and start hand stitching it to the back
  3. Journal cards and tags
  4. Painting project
I am still working on quilting projects along with paper crafting.  AND I will be posting photos of my quilting and projects.


Be sure to check out what everyone else is working

Smiles and hugs....Caryl

Friday, June 9, 2017

mug rug with stamped and stitched flower tutorial

 I used Sunkissed jelly roll for the squares...
The top right is Kona Cotton PFD Bleach fabric.
 I used Hero Arts stamps CL375.  I stamped the images with Versa Color petal pink and split pea.
Then I stitched the stamped image with a layer of batting underneath.
I used Wink of Stella to outline the lines in the flower image.
And Copic RV02 on the flower and Copic YG03on the leaf.
I used Copic Y21 for the center of the flower and the background.
 Photo of some practice pieces which is so helpful to figure out what works and what doesn't.
I researched online what works on fabric and surprised about some of these that I used.
I have some fabric markers but not in the right colors for this project.
Cute backing fabric shows the quilting too.  The thread I used was Superior Perfect Quilter variegated 085 Sunrays wt 17 on the top and bottom line in the bobbin.

I am linking to crazymomquilts finish it up Friday and
Linky Tuesday Freemotion by the River.

Smiles and hugs....Caryl

Saturday, April 8, 2017

Disappearing Jelly Roll Rails quilt

 A Friday finish this week........will link to finish it up Friday crazymomquilts...
I did the hand stitching on the binding this week while waiting at the hospital during my DH knee replacement surgery.
 I did a tutorial on making this quilt in an earlier post  http://carylquilts.blogspot.com/2017/03/disappearing-jelly-roll-tutorial.html
I used the binding tool for the first time and watched several videos for how to use it....
I mainly took the photos for myself to remember next time..........


I will also link with Connie at Freemotion by the River for Linky Tuesday.

Smiles and hugs....Caryl

Wednesday, March 22, 2017

Disappearing Jelly Roll tutorial

 Are you looking for a project to use up some jelly roll pieces?
This is a tutorial and a story of how this quilt came about!!
Last weekend I was making a charm box mini quilt....very similar to the one I made last summer that was smaller...It is a pattern from Fat Quarter Shop....

AND I got an idea to use jelly roll strips.....so I started another project!
 I dug in my scraps and used 9 jelly roll strips, each about 17" long, and sewed them together...
I  put the zigzag strips at the 1st 5th and 9th positions....no particular reason, just balancing the look...
Then I cut down the center of every other strip starting with the first strip...
The above photo just shows the start of cutting one group....
Then I cut each of the 4 groups every 4" using my Stripology ruler....so I had 4" squares...
My idea was to use these 4" blocks and mix them with strips and squares.

BUT I started putting them in an alternating pattern and before long there was a pleasing pattern!
AND I ended up with a 14½" square miniquilt top!  Now to quilt it and bind it....
Smiles and hugs....Caryl

Friday, August 5, 2016

D9P mug rug tutorial

Step by step instructions for a cute little mug rug that is so fun to make.....
These are specific directions for this mug rug.
 Make a 9 patch block.....using jelly roll strips...sew groups of 3 strips x 3....
OR if you are making just one mug rug use 2½" squares...

I made sure to have darker fabrics on the corners and a plain red in the center...
And lighter colors in the centers of each side.
 Cut the 9 patch down the center each way to make 4 blocks........
 This is the arrangement I chose for this block but you can arrange it any way that you like....
Place the batting behind the block and do FMQ with words and loops and hearts...
Stitch close to the edge of the block where the opening is going to be so the seam doesn't unravel when you are turning it.
Use a light box to mark the edge of the block on the batting with Frixion pen.
Put right sides together and stitch 1/4" away from the mark and leave about a 2" opening.
Trim away the extra batting and trim the corners.
Pull through the opening and poke out the corners.

 Put glue on the seams in the opening to hold them together and press the seam all around.
Then top stitch close to the edge.

I made this last month specifically for an online friend that makes Christmas gifts all year.
I wrote on the back - Queen of Christmas Countdown.

Several years ago I made some that were very similar to this one.  Let me know if you make any of these following my tutorial.

Linking to Linky Tuesday Freemotion by the River

Smiles and hugs....Caryl

Thursday, November 19, 2015

ticker tape mini quilt

I have wanted to make another ticker tape quilt for awhile.  They are so fun to make.
I got a lot of music fabric at an estate sale and it seemed like a fun background for a mug rug.
 These are about the easiest thing to make...and here is a short tutorial on how I made it:
Sooooo.....grab some scraps and start sewing......Place your scraps of fabric leaving some spaces..
I used the music fabric for the front and the back and cut it larger than the batting.  I brought the back around and used it for a self binding.  The photo shows how I folded the back all around and pinned to keep it out of the way when trimming the front and batting.
 Then I trimmed the back 1" beyond the front and folded it in half and then half again....
then brought it around to the top.....
 I used a decorative stitch around the edge on top.  On my Bernina I used stitch #332...
the setting was 2.2 length and 4.5 width

This one is 10 x 5½............AND I will be making larger ones too.
Let me know if you make one of these.........

Since this is a finish...I am linking with crazy mom quilts Finish it up Friday...
Also linking to Freemoion by the River Linky Tuesday...

Smiles and hugs....Caryl

Thursday, June 18, 2015

Scrappy picnic quilt blocks

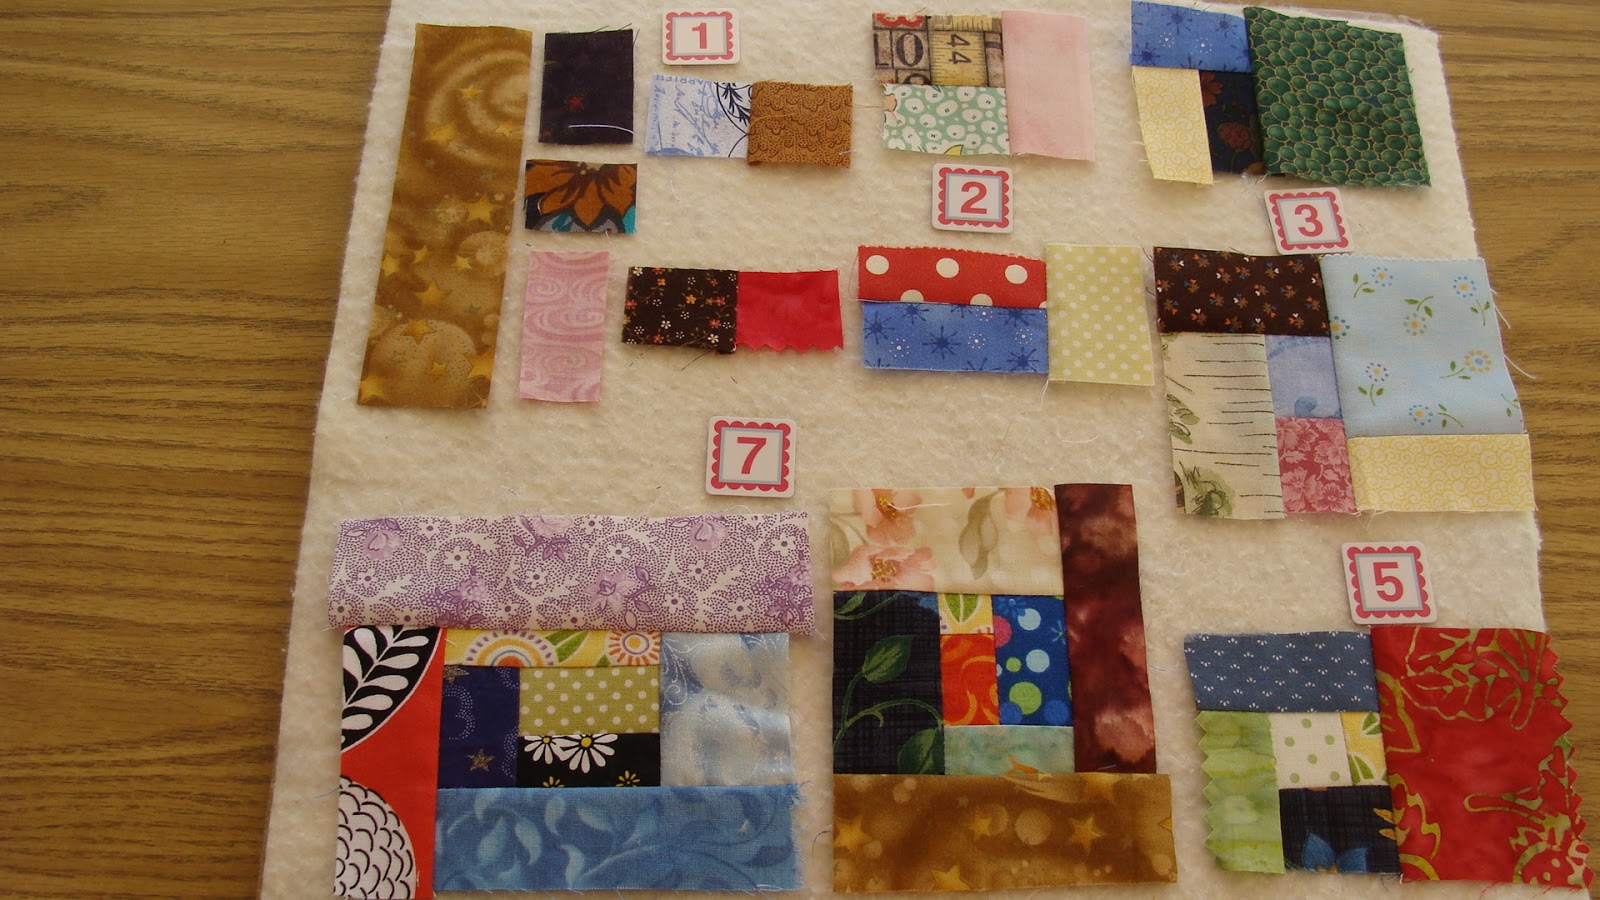
 Visual tutorial (and a few written ideas) on how I put the made up blocks together...
               (the numbers are the number of seams in each group)
***sew 2 fabric pieces together OR a long strip with small pieces added in a chain
***I turned each piece and straightened the sides and added another piece
***I kept adding pieces of fabric sort of like log cabin blocks most of the time
***sometimes instead of one strip...I added a strip that was several pieces (#5)            
 The size of the blocks vary a lot depending on the size of each piece...(#7 two different blocks)
 I trimmed them to 4½" blocks and combined some of these blocks with the 16-patch blocks I made..
I explained how I made the 16 patch blocks  on this blog post
 Most of the quilt has 4½" 16 patch blocks and here are 2 of the 4½" blocks together...
showing the back to show the pressing (the center seam is not pressed in this photo)
I made 8½" blocks from the 4 4½" blocks and then sewed into rows and rows together.
There are 30 8½" blocks in this quilt.

Now I will figure out how to quilt it and I might not bind it....haven't decided for sure!
I had fun making these made up blocks and the 16 patch blocks.....
and ask if any questions about this process.

There are a lot of ways to do improv blocks and now I will switch to following along with
crazy mom quilts scrap vortex QAL.  She posted week #3 yesterday.

One thing for sure I will jump back and forth between lots of projects....
I have lots of interests and am having lots of fun!!

Smiles and hugs....Caryl

Linking to Connie Linky Tuesday at Freemotion by the River

Thursday, May 21, 2015

Blue with stitched flower mug rug

 Here is a little tutorial of how I did this mug rug/small placemat...
I used 2½" squares and the right upper corner is 4½"...
 I used a larger piece of blue than 4½" and stamped a Hero Arts stamp CG134....
I used a fabric ink pad but I needed to see the lines better for stitching.....soooo....
I copied the stamp on vellum and taped the fabric on top and used a light under to see and
traced with a Frixion pen.  These pens are great...easy to write on fabric and the ink is erasable.
 I used a walking foot and the thread is varigated rainbow 838.  I used a shorter stitch (Bernina 1.5 to 1.8) following along the flower lines.  I did the flower first with the batting and then cut the square to 4½" and added to the rest of the blocks.  I then put a layer of batting under the whole thing (this corner has a double layer).  I trimmed some of the batting in the seam areas around the top corner.
I also trim my batting and backing AFTER I add the binding.
Here is the back using the wonder clips to hold while I hand tacked the binding.
I loved doing this project and this tute will help me if I want to make another one!!
so now.....let me know if you make one of these!

I will link to crazymomquilts finish it up Friday..
And to Freemotion by the River Linky Tuesday

Smiles and hugs....Caryl

Saturday, March 7, 2015

Microwave bowl holder tutorial


 I put a photo collage on instagram last evening of this project I finished this week.  A microwave bowl holder that I made and gave as a gift last evening.  These are fun to make and so easy.  I used Wrap-N-Zap and two Paris related fabrics each cut 11" square.  Quilt an X from corner to corner on each fabric with batting.  The blue shows the X quilted.


Darts are made after folding each side to the center.
The darts are 1" in and 2 1/4" down.
Pin right sides together and stitch around edge.
Leave about a 3" opening for turning.
Stitch around the edge on right sides....done!

Linking with Link a Finish Friday.
Also linking with Linky Tuesday Freemotion by the River.
Smiles and hugs....Caryl